# Updating HubSpot contacts with Inbox using Flow Builder
As Inbox is tightly connected with FlowBuilder, our workflow tool, in this guide, you’ll learn how to integrate [Inbox](http://flowbuilder) with third party systems using [Flow Builder](https://dashboard.messagebird.com/en/flow-builder).
The existing [HubSpot integration for Inbox](https://dashboard.messagebird.com/en/integrations/hubspot/) allows contact synchronization from Hubspot to Inbox. To synchronize data back to Hubspot (e.g. transform every Inbox inbound request into a Hubspot contact), you can use FlowBuilder and the Hubspot API. This guide will take you step by step through this process.
**Prerequisites**
* An [Inbox account](https://inbox.messagebird.com/)
* A [Hubspot account](https://www.hubspot.com/)
* Knowledge of the Hubspot API (v3 preferably)
* [Flow Builder](https://dashboard.messagebird.com/en/flow-builder)
**Pro-tip:** In this guide, samples are provided to navigate the more technical aspects. Be sure to import the provided flow for details.
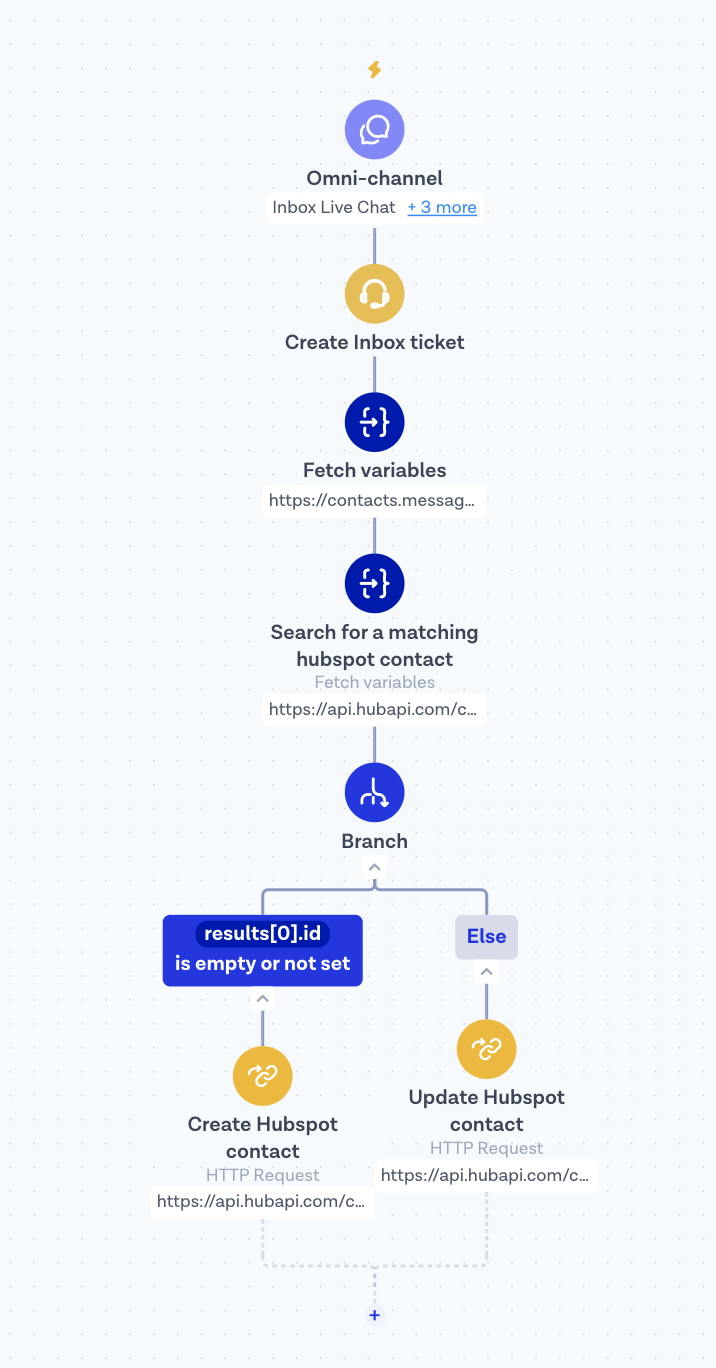
**What it will look like**
Sometimes it’s easier to understand how to get there if you can already see where you’re going, so here is the final flow we will build:
**What we will be doing**
* Customize the default Flow Builder **Inbox flow** (which is created by default for every Inbox installation
* After the Inbox interaction is concluded (ticket resolved), we will check if this is a known contact in Hubpost
* * Yes: we will update the HubSpot contact with the latest Inbox data
* No: we will create a new HubSpot contact with the latest Inbox data
**End result as importable JSON**
You can [import this flow ](https://app.box.com/s/vikfm9b7tfzbfhnzlm945evyehkv2v5z)directly into your sandbox. You’ll have to connect it to the appropriate channels.
If you already have an Inbox Flow (Conversations) flow, deselect the channels from the first step, Omnichannel and you’ll be able to select them in the flow you just imported.
**Step by step**
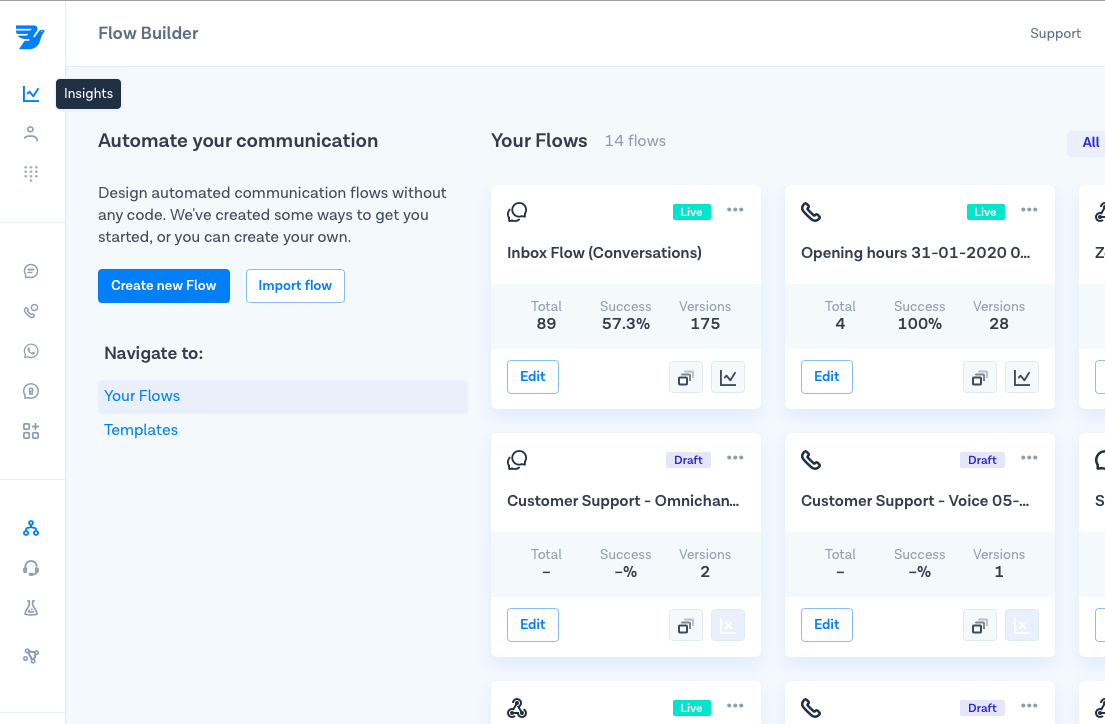
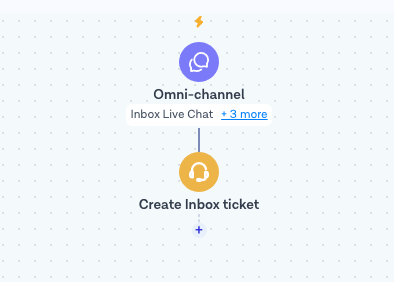
**Step 1: Locate the flow corresponding to your Inbox installation**
1\. Go to [Flow Builder](https://dashboard.messagebird.com/en/flow-builder) and choose the Inbox Flow (Conversations) flow.
\
By default, this flow has one step, **Create Inbox ticket**:
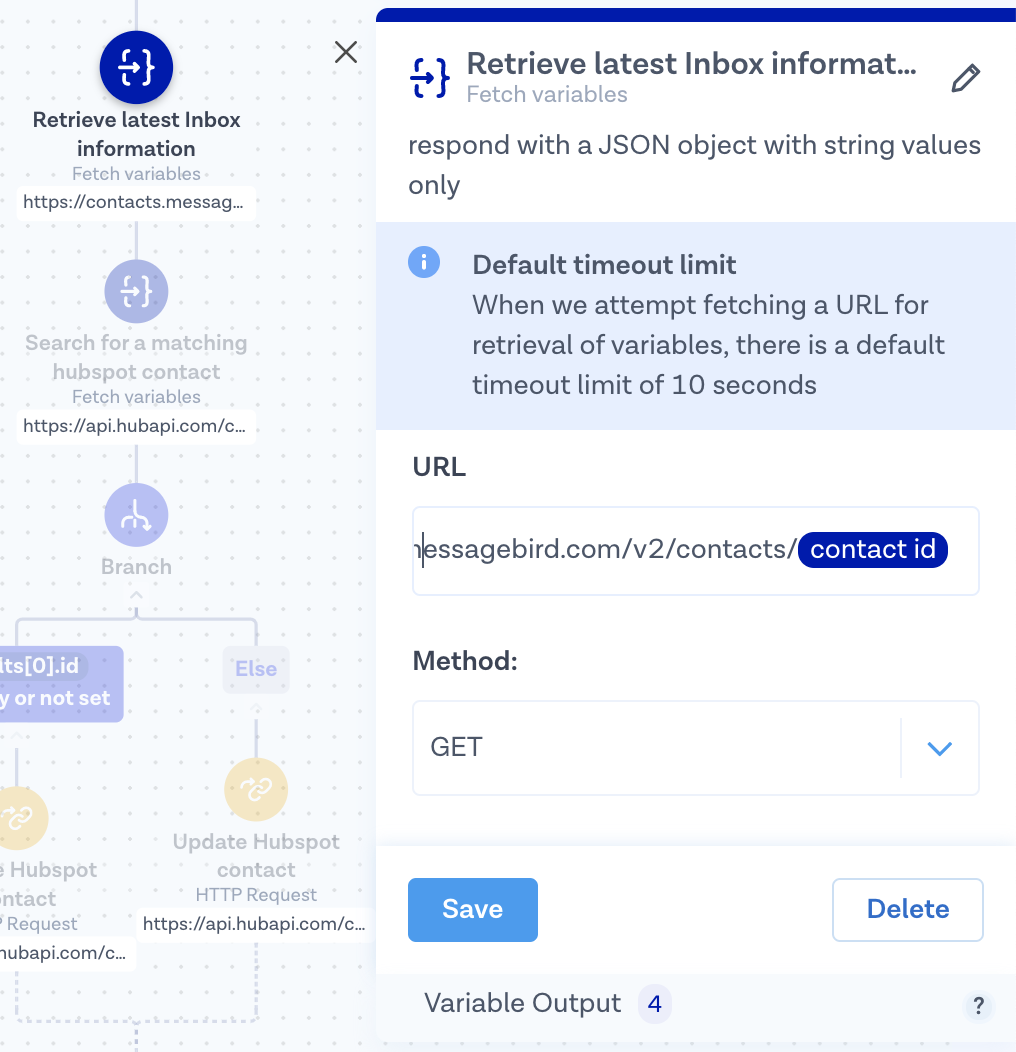
**Step 2: Retrieve the updated Inbox contact information**
During the conversation with the user, the agent might discover new information about the user (e.g. company name, email, etc.). While the agent will update the Inbox contact information, we want to make sure this information is synchronized back to HubSpot.
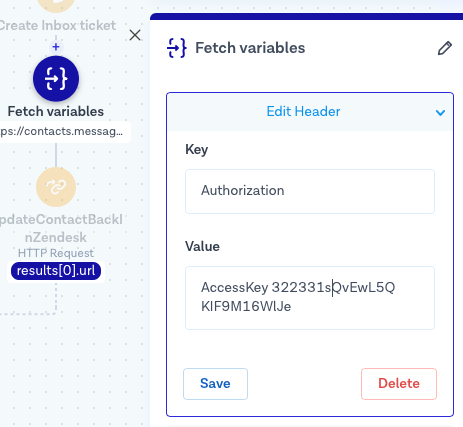
1\. Let’s make sure the flow has access to the latest Inbox contact information. We’ll add another **Http Fetch** step, make a call to the V2 version of the [Contacts API](https://contacts.messagebird.com/v2/contacts/), and pass the contact ID.
2\. Since the MessageBird APIs use API key authentication, we will also add an Authorization header of type *AccessKey*, followed by the MessageBird API key. You can find your key on MessageBird Dashboard, under [Developers API access](https://dashboard.messagebird.com/en/developers/access).
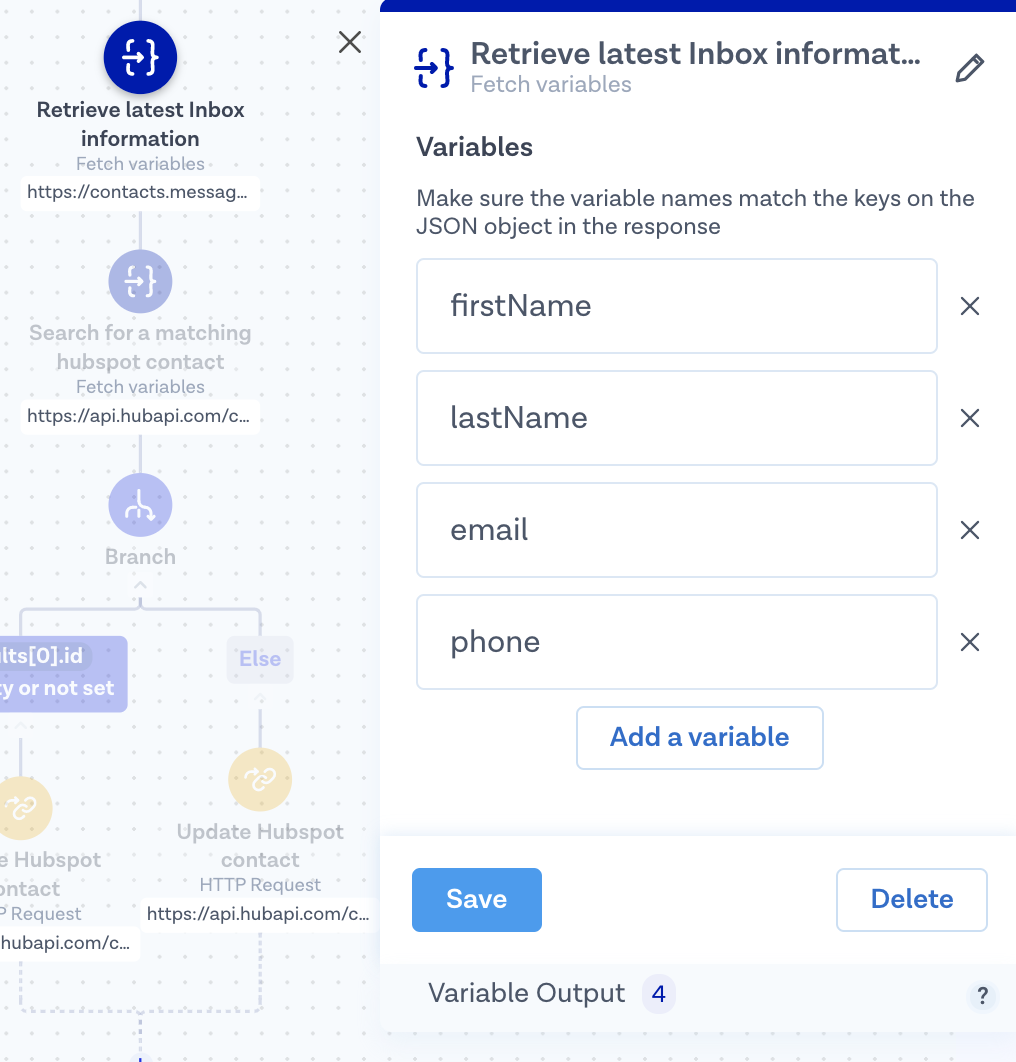
We’ll store the updated Inbox information in a set of variables:
**Step 3: Locate the appropriate contact in Hubspot**
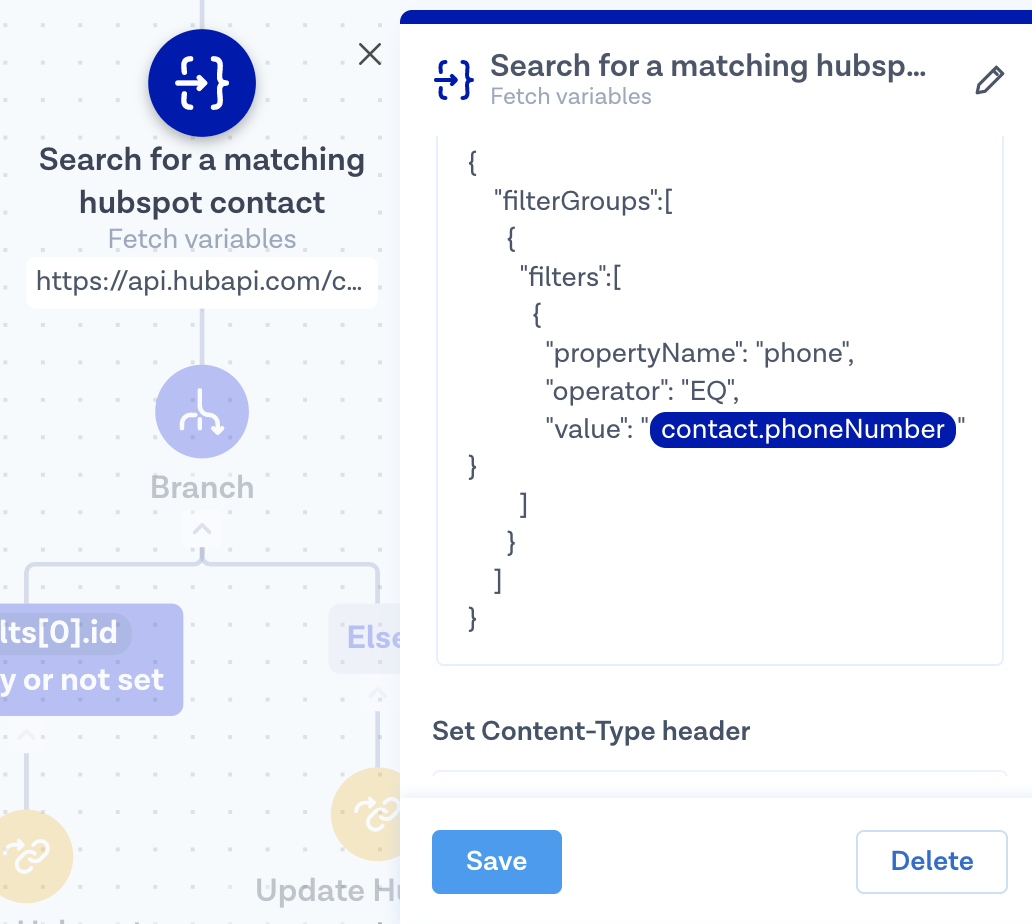
To know if we're dealing with a brand new contact or an existing one we will do a **lookup (search) inside Hubspot**, in this case, considering that the phone number would be the unique user identified
**Pro-tip:** This is perfect for WhatsApp interactions where the phone number uniquely identifies the customer. If you are planning to do email or live chat support, then you might want to change the lookup algorithm to search via email address, first name, or last name).
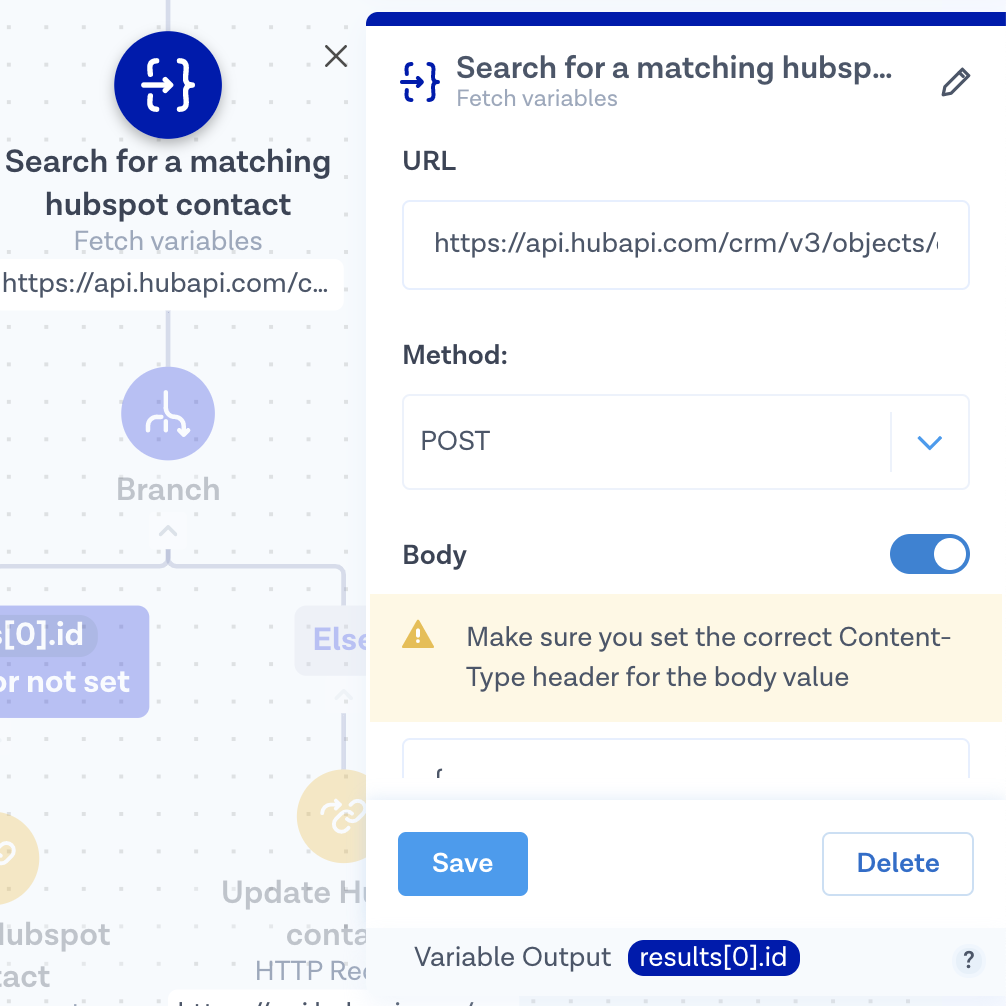
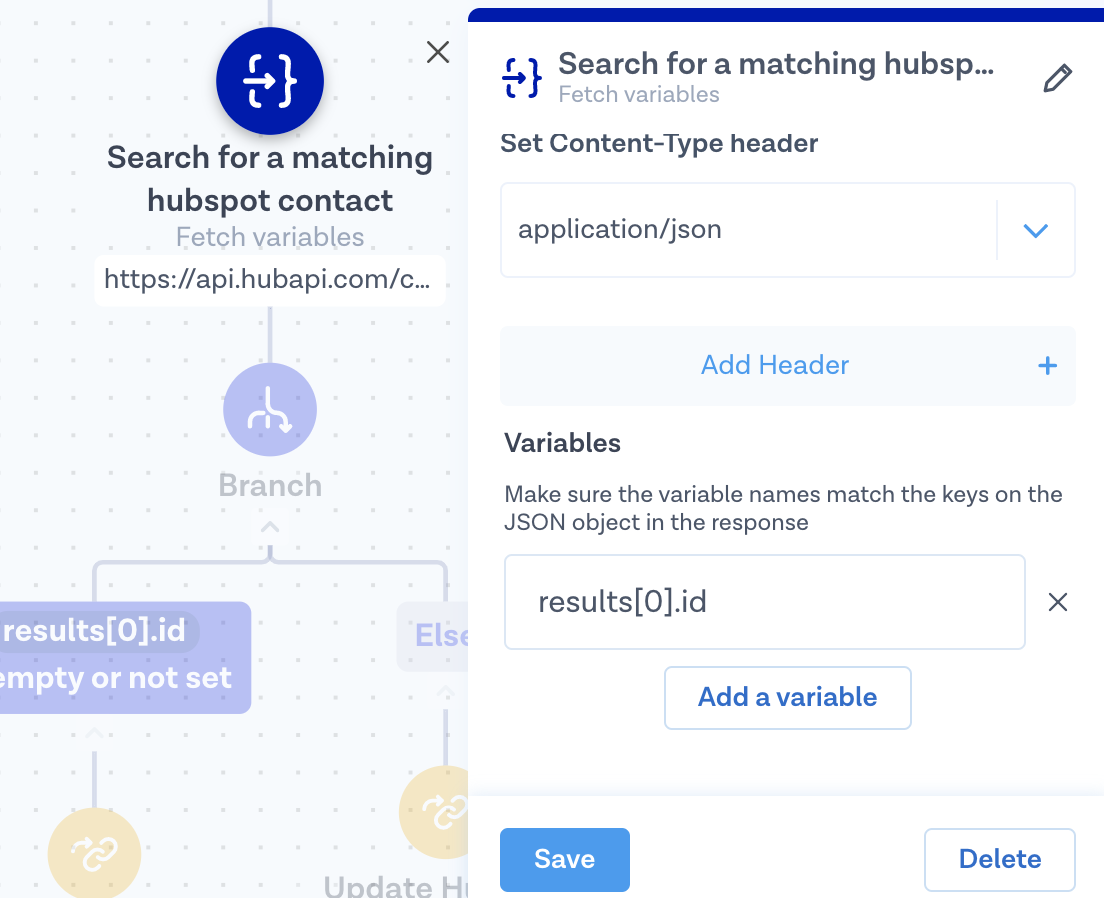
1\. We will use the [Contact Search API](https://developers.hubspot.com/docs/api/crm/search) from Hubspot by adding an ***HTPP Fetch***** step** with the following configuration:
* URL: [https://api.hubapi.com/crm/v3/objects/contacts/search?hapikey=yourHubspotAPIKey\ ](https://api.hubapi.com/crm/v3/objects/contacts/search?hapikey=yourHubspotAPIKey)
* You can retrieve or create a new API key from your [Hubspot account](https://app.hubspot.com/api-key/). Just go to **Settings**, **Integrations**, and choose **API key**.
* Method: **POST**
* Body:
```
{
"filterGroups":[
{
"filters":[
{
"propertyName": "phone",
"operator": "EQ",
"value": "contact.phoneNumber" }
]
}
]
}
```
* Content Type: **application/json**
\
* In the end, we’ll save the returned results in a variable, results\[0].id
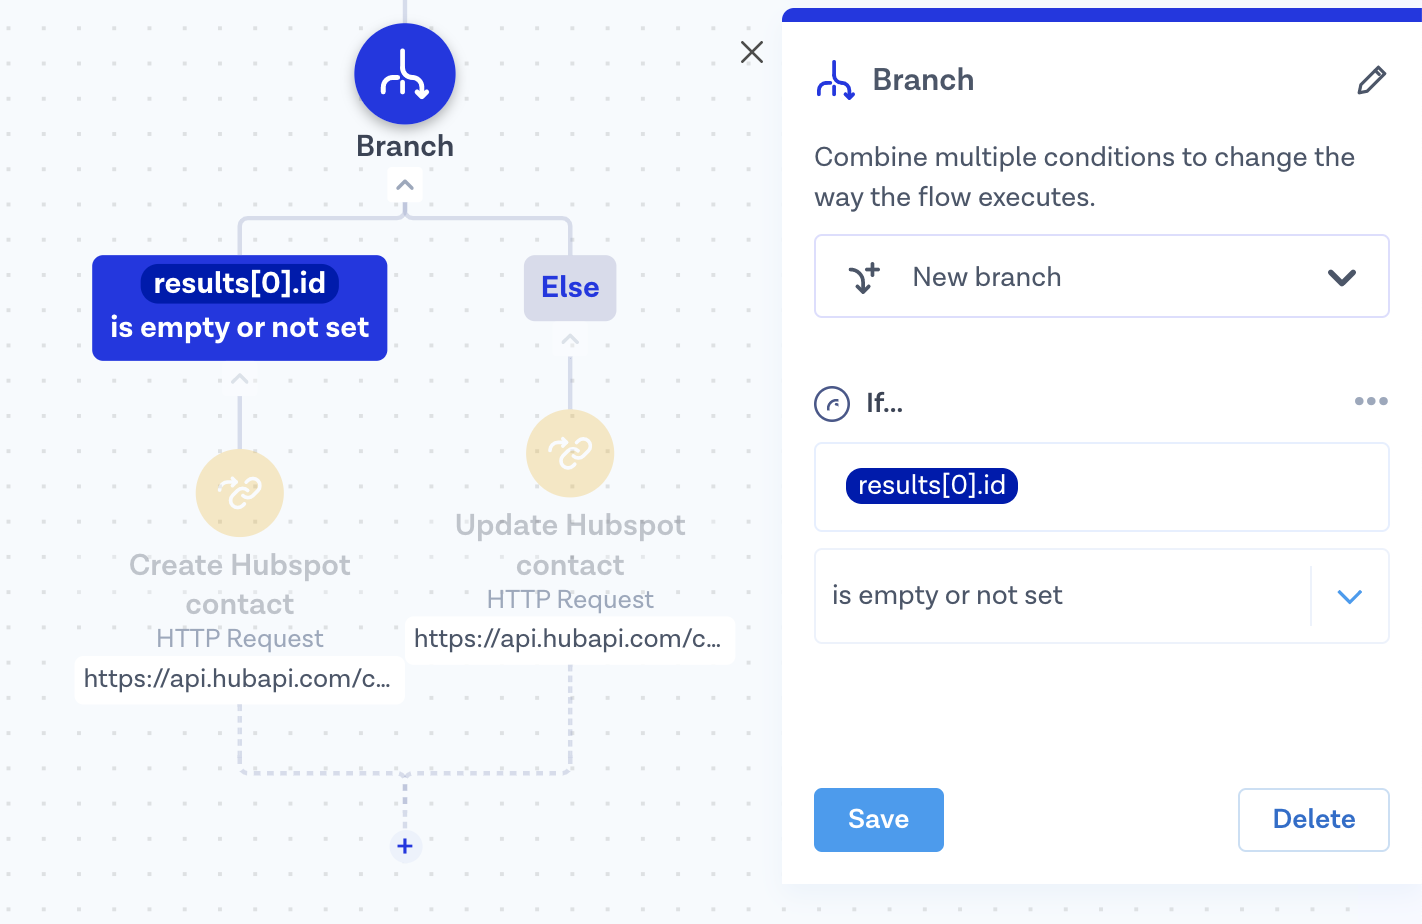
**Step 4: Decide if we are dealing with a new contact or an existing one**
1. We’ll add a **Branch step** to check if we have received any results inside the **results\[0].id** variable. If we have, then we’ll do a contact update; otherwise, we’ll create a new contact:
**Create/Update a Hubspot contact**
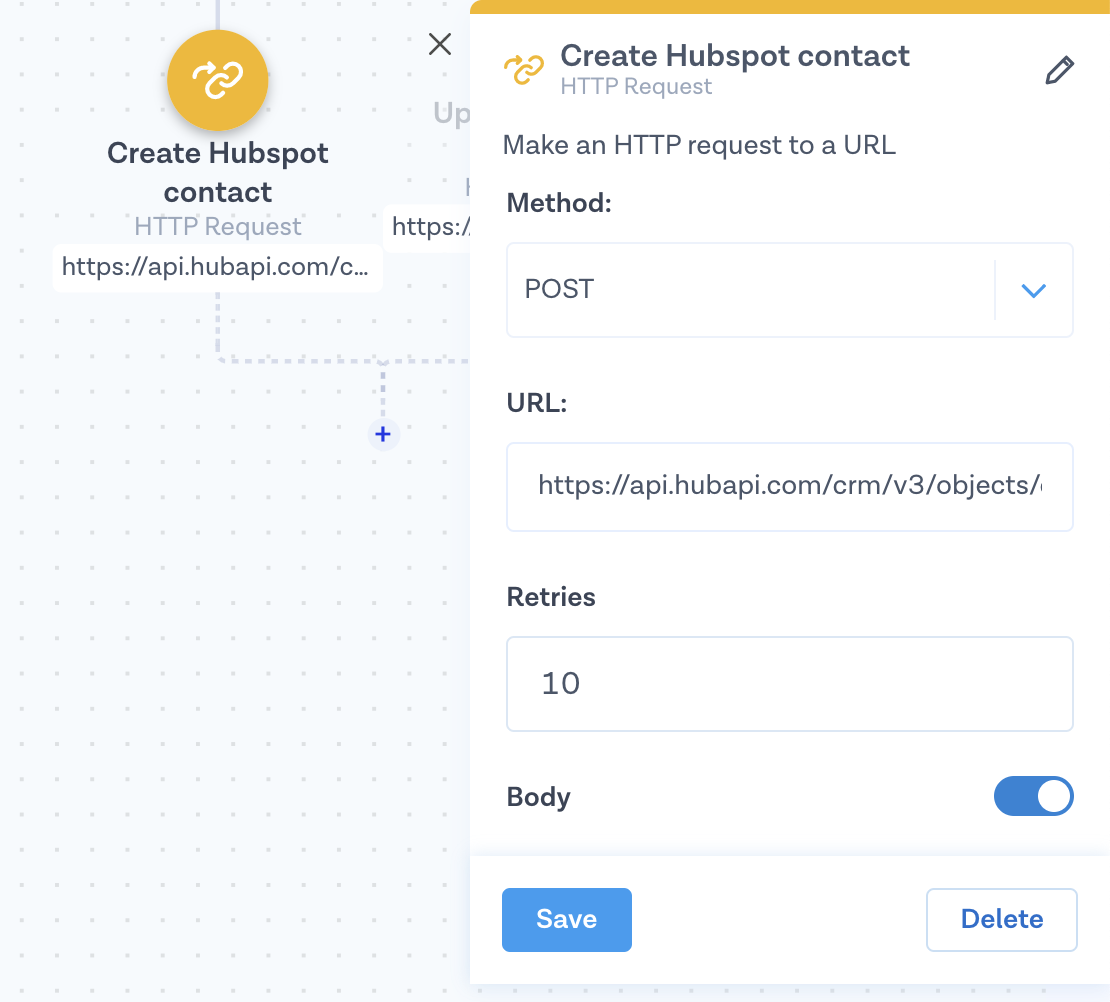
1\. If we have identified any matching Hubspot contacts, we’ll create a new contact using the [v3 version of the Hubspot API](https://developers.hubspot.com/docs/api/CRM/Contacts#endpoint?spec=POST-/crm/v3/objects/contacts/batch/create).
Add a **HTTP request** step with the following configuration:
* URL:
* Method: **POST**
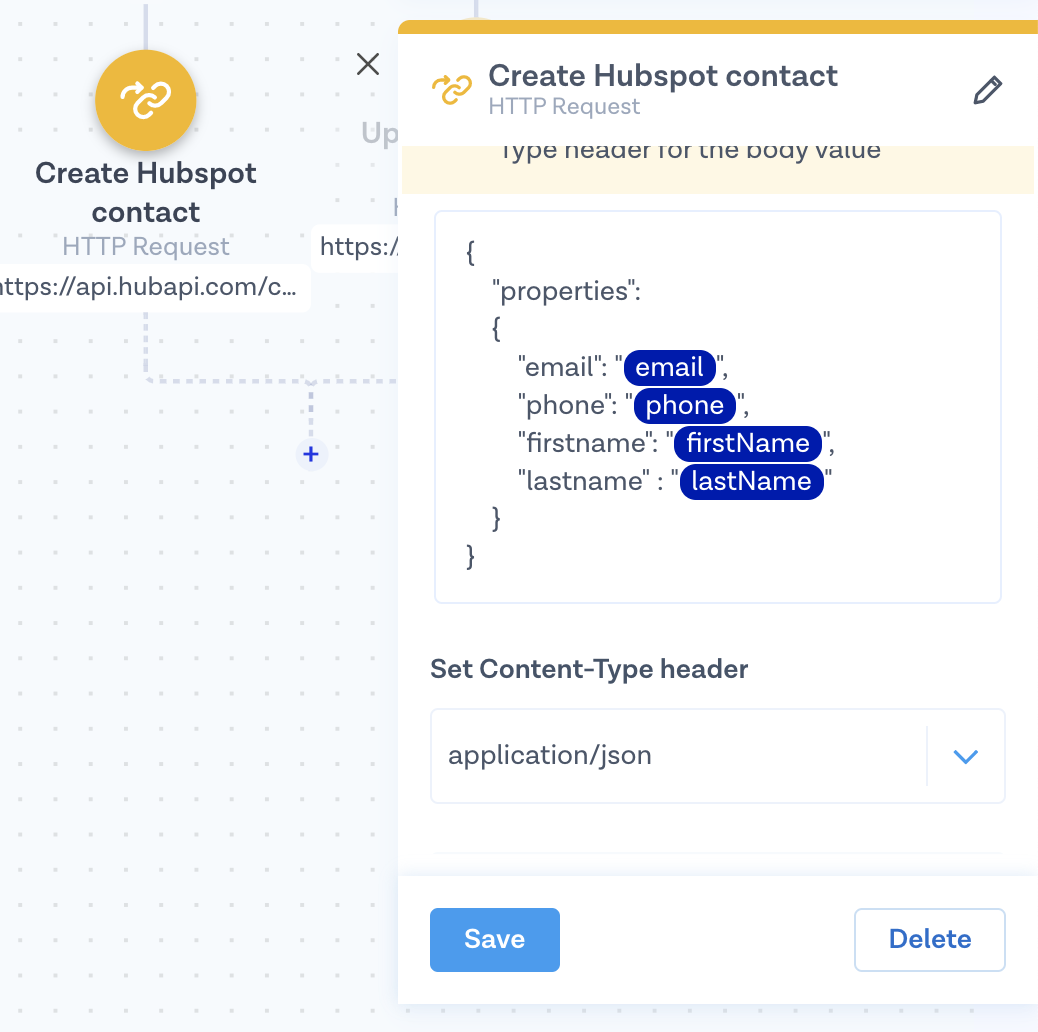
* Body (scroll right to see the full snippet):
```
{"properties":{"email":"email","phone":"phone","firstname":"firstName","lastname":"lastName"}}
```
* Content type: **application/json**
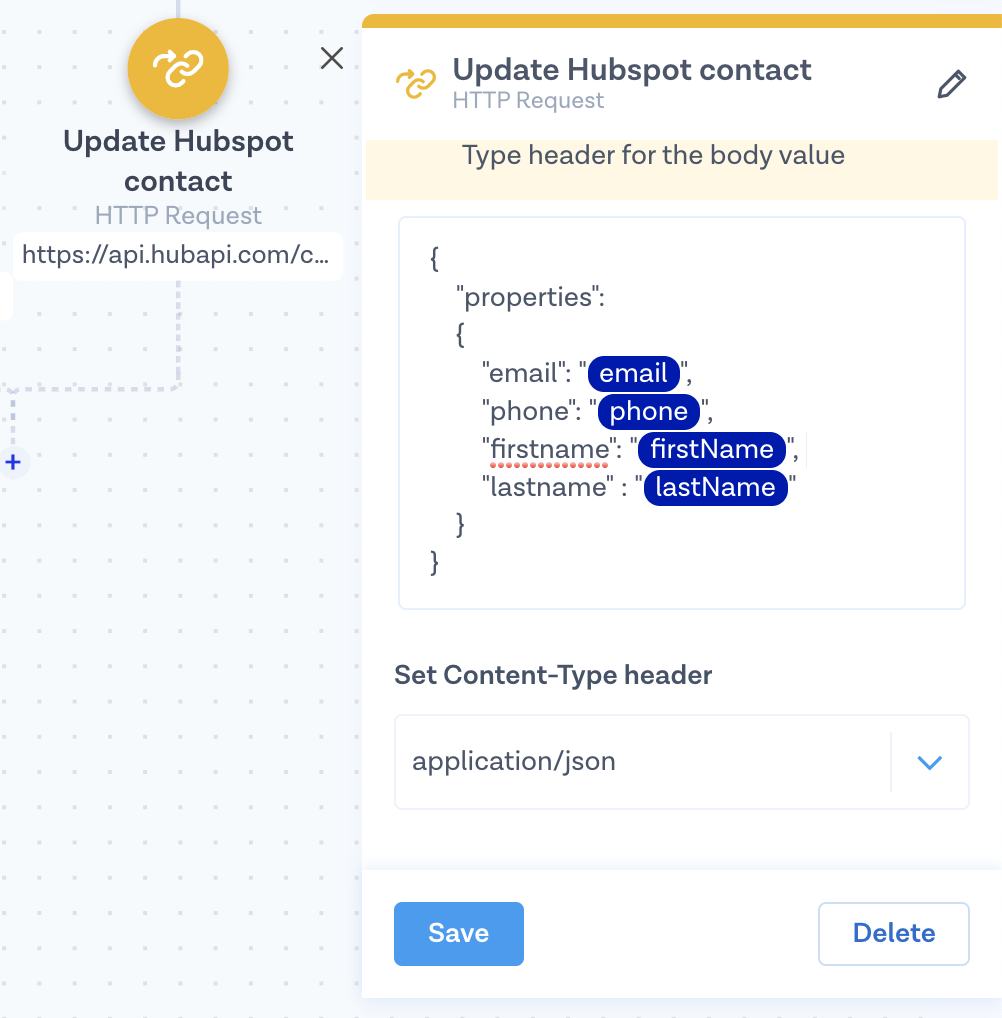
2\. If we are dealing with an existing contact, we will use the [Hubspot update contact API](https://developers.hubspot.com/docs/api/crm/contacts).
Add a **HTTP request** step with the following configuration:
* URL: results\[0].id?hapikey=yourHubSpotAPIKey
* Method: **Patch**
* Body:
```
{
"properties":
{
"email": "email",
"phone": "phone",
"firstname": "firstName",
"lastname" : "lastName"
}
}
```
* Content type: **application/json**
**Pro-tip:** If you get stuck, don’t forget that you can just [import the end flow](https://drive.google.com/file/d/1zy9tXS7hdcnqRmUNOaaq1GP4AWgni3L-/view?usp=sharing)!
3\. **Publish** your flow in the top right corner of your screen, and you're good to go!
And that’s it! 🎉 Now you know how to connect Inbox to HubSpot using Flow Builder.